Creating a new Managed Service Fabric cluster with AAD access
Right off the bat - I have to say if you're here because you have an existing cluster and you just want to convert it over - you can't. There's no in-place migration path. However, if you can take down the cluster for a while, launch a new managed cluster and reload code - this blog is for you.
Recently, I had some trouble with a development Service Fabric (SF) cluster. I deployed some code which didn't fully take. However, the cluster was set on "Silver" reliability and doggedly tried to make things right - which made things wrong.
After discussing an unrelated issue with Microsoft, it was suggested a faster way to solve my dilemma would be to nuke and rebuild the cluster. Since it's only a Dev cluster, I agreed.
I didn't know "Managed Service Fabric" was even a thing. When I went to rebuild the cluster, I noticed that I now had that as an option. It's new - went GA May 11 of 2021. Microsoft tech support is still getting familiar with it. But here we go anyway...
Objective
Secure the cluster for perusal by Service Fabric Explorer (AKA SFX) using Azure Active Directory (AAD). Previously, I had everyone using certs to connect and manage and - certs expire - and if they're self-signed, most browsers really hate them. IMPORTANT-If you intend to host your cluster on a Linux box, this currently won't work. SFX access via AAD is only supported on Windows setups as of the writing of this entry.
Prep work
- Check your Azure Active Directory Custom domain names. If you don't have a "Verified" custom domain, stop right now. When you try to run a PowerShell script (step 6), it's going to ask you for the cluster name. That cluster name must include a verified domain name. If you don't have one, the script will fail. I believe this is new(ish) but basically an Azure AAD mandate.

- You're going to want/need these Service Fabric AAD helpers.
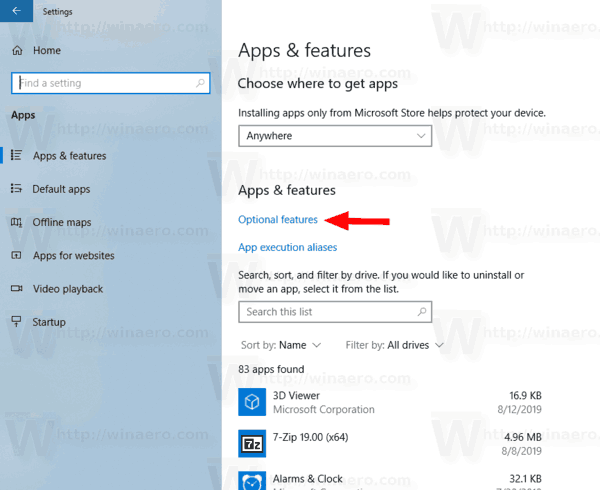
- If you don't have it already, you may want to make sure you have PowerShell ISE installed. In the Win10+ environments, it's usually installed by default. If not, check your optional features (here it's called "Windows PowerShell Integrated Scripting Environment":
- Find your tenant ID in Azure.
- Go to the directory into which you either cloned or copied the AAD helpers from step 1. Using either PS or PS ISE, use this little scriptlet to configure a couple of Azure AAD principals.
- Paste this script into PS or PS ISE, change the relevant values and let it rip. The graphic below shows me running this in PS ISE. Obviously use your own tenant id from step 4. The name of the cluster is whatever you want it to be, BUT, it must be fully qualified to a verified domain. That's why step 1 is so important. Note that the WebApplicationReplyUrl is NOT the same. There, it's the name of the cluster, then the region, then boilerplate .cloudapp.azure.com:19080/Explorer/index.html. In my case, I'm calling my cluster "tpmmsfcluster" but here, just replace "YOURCLUSTERNAMEHERE" with whatever you want. Just keep in consistent through the rest of the steps.
$Configobj = .\SetupApplications.ps1 -TenantId 'XXXXXXXX-XXXX-XXXX-XXXX-XXXXXXXXXXXX' -ClusterName 'YOURCLUSTERNAMEHERE.verifiedDomain.com' -WebApplicationReplyUrl 'https://YOURCLUSTERNAMEHERE.eastus2.cloudapp.azure.com:19080/Explorer/index.html' -AddResourceAccess.\SetupUser.ps1 -ConfigObj $Configobj -UserName 'TestUser' -Password 'P@ssword!123'.\SetupUser.ps1 -ConfigObj $Configobj -UserName 'TestAdmin' -Password 'P@ssword!123' -IsAdmin
Once you've run the script, you'll need to collect those values:- ClusterApplication - "90f..." (it's an ID)
- ClientApplication - "26b..." (it's also an ID)
- ReadOnly User Id - "b8d..."
- Admin User Id - "cb9..."
- Go to the Service Fabric Clusters blade in your portal. Click Add and select "Service Fabric managed cluster".
NOTE the cluster name. It MUST match the cluster name you used in the script (along with the fully qualified domain).
For the sake of this demo, I've selected a small Node size. The highlighted elements are the output of the PS script.
I also recommend setting the upgrade wave to Wave 2 - which is the last wave to upgrade when they rev the Service Fabric runtime version. Wave 0 is bleeding edge. There's probably nothing wrong with that (the default), but I'd rather something fail on somebody's cluster first. #notNice
When you're all set, you should get to the final validation screen. - Grab a coffee... this takes a while.
- Once your cluster is up and running, it'll tell you and you can go right to the resource. Looks like this:
- Now - click on "Explorer". You will probably see SFX come up for a moment, but it should be rapidly followed by this:
Obviously - you'll actually have accounts and not a big, black redacted, super secret list. - At this point, no matter what account you've chosen, unless you've got back into Azure AD and granted the user permission to deal with this new cluster... you'll get this:
- Recall in step 6 how we made two new users with the script? It's time for them to shine. For the record, this is not necessary - since you already have permission to create the managed SF instance, you can just grant yourself permission. But for completeness, here are the steps necessary to fully actualize the newly created admin user.
- Go to the managed SF instance and click on "Access Control (IAM)".
- Add the admin user as a contributor to the role assignments:
- I can get to SFX either by loigging into the portal, or by going directly to the management URL specified in the script as:
https://YOURCLUSTERNAMEHERE.eastus2.cloudapp.azure.com:19080/Explorer/index.html
Either way, I need to use the same credentials. Going to SFX will prompt me to log in. - To log in with that new Admin user, you need to know the PS script is going to create the user at onmicrosoft.com. Using the password I defined in the PS script, I'm have to log into the Azure portal as:
tpmmsfTestAdmin@yourVerifiedDomainHere.onmicrosoft.com. - If all goes well, you should see something this (with your cluster name of course):
- If it worked all right, and it's sufficiently late in the day... Coffee, you're on the bench. Alcohol, you're up. ;)


Comments
Comments are closed